Managing Labels in Layout
Adding labels to map layouts is a great way to add important information and value to a map. There are many options available in Sitewise that allow you to customize labels to suit all your mapping needs.
Sitewise Layout provides three options for editing labels:
- Layer Labels
- Anchor Labels
- Batch Labels
For this article, you must know how to add a map and other layout basics. For more information on this, check out our Getting Started in Layout article.
Use Case:
- I would like to add logos to a layout map for the traffic generators around my site of interest, is this possible in Sitewise Layout?
- I would like to add custom formatting to some of my labels in layout. Is there a way to do this?
- Is there an easy way to add the Store Name as a label to all of my locations?
- I want to add the Store ID and the CY Sales to all of my locations. So far, I’m doing this one at a time, but I have 10 more locations. Do I have to do it by hand or is there a way to batch label? I need the ID and sales data to be dynamic, based on the location.
The good news? We have answers to all of these use cases and more in the options below! What you use depends on your particular needs and how you want to design your Layout map.
Layer Labels
When you first add a map to Layout, the layers you add keep their settings the same as they are in the map tab. The labels in your account are set up to turn on within a specific zoom range to avoid cluttering the map. Therefore, when a layer is brought into Layout, the labels will show within the set zoom level. This may not be ideal for the map you want to create.
Luckily, we can edit these settings to either turn off layer labels or add them depending on your needs. The best part is whatever changes are made to a layer in layout will not affect the layer as it appears on the Map tab.
Let’s review how to edit layer labels.
- Once a map has been added to Layout, click on the layout map to display the Map Properties tools, and select the Update Map Layers icon.
- In the Update Map Layers dialog box, a list of the map layers will be displayed under Current Map Layers.
- Click the
icon next to the layer you wish to edit.
- The Edit Layer panel will open on the right side of the screen. This is where you can edit the layer’s style, including its labels.
- Click on the Labels checkbox to toggle labels on or off using the checkbox.
- To edit the label properties, click on the Aa button.
- Here you can edit the attribute used in the label display, zoom level that labels display at, font size and color, and the halo around the label. You can find more information about label settings for layers in Sitewise here.
- Setting the zoom level to 1 will display the labels at any zoom level in layout.
- After editing the label settings, click Update, and then Change at the bottom of the layer panel to save the label changes.
- The newly edited labels should now be displayed in the Layout map.
One issue that may arise with this labelling technique is that you cannot move labels if they are overlapping or blocking other features. If this is an issue, it’s best to use Anchor labels. Make sure to return to the layer settings and toggle the labels off by unchecking the Labels checkbox.
Anchor Labels & Icons
These labels are typically used when there are not too many features to label or each feature you would like to label requires a unique label. It allows you to anchor each label to any point on the map and dynamically move them if adjustments are needed.
If you need to create multiple anchor labels at the same time, check out batch labels. It’s a quick way to add anchor labels using the same parameters to all features at the same time.
- Click on the map to expose the Map Tools at the top of Layout. Select either the Anchor Text or Anchor Icon tool.
- Anchor Text will allow you to input a custom text label.
- Anchor Icon allows you to add any standard logos or pushpins in your Sitewise account within an anchored box.
- Once selected, the mouse cursor will turn into a crosshair, indicating that you may now place the text or icon label on the map.
- Once placed, the anchor callout will appear on the map. If needed, you can click on it to resize or reposition, though this can be done later as well. After clicking on the Anchor Callout, the top menu bar will change to show the Anchor Tools.
- Anchor Text Tools will allow you to edit the text, font size and alignment. Additionally, you can edit the connector type, the anchor’s location coordinates, the anchor node type, size, padding, fill and stroke color. You can also set the font color here.
- When happy with your settings, click Change.
- The Anchor Icon Tools will be almost identical, except for the option to add icons or logos to the label instead of text.
- Click on the plus button beside Logos. A new window will appear showcasing standard logos in your Sitewise account.
- Use the search bar to search for a specific brand or select a category from the dropdown menu to narrow down the logo options.
- Toggle the selection at the bottom of the window to switch between logos and pushpins.
- You can add multiple logos to a single Icon label. Please note that adding too many may cause the callout to become cluttered.
- When you’re done adjusting the anchor settings, click change. The changes will now be visible on the Layout map.
- Several remaining options are available in the top menu bar for the anchor callouts including:
- Anchor Text: font, bold, underline, italicize, text color, callout background color, callout outline width, outline colour, and opacity of the Anchor Label.
- Anchor Icon: callout background color, callout outline width, outline colour, and opacity of the Anchor Label.
Managing Anchor Labels
Once a label is added to the mapset there are several options available for managing how this label is used in your map as well as its position on the map canvass.
- To move any label, simply click on it, drag and drop is at the desired location
- To resize a label, select it to expose the anchor points which form the bounding box of the label. Once exposed, select one of the corner points by clicking on it, and dragging it inwards or outwards until it is the desired size. Note that this will affect how the text or icons are displayed inside the label.
Layout Elements
The Layout Elements panel on the right of the screen also offers some convenient options for managing various map elements in the Layout tab, including any labels that have been added to the map.
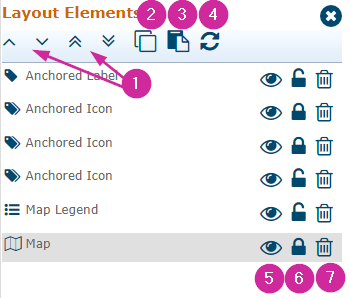
- Use the arrows to move any map elements up or down which will determine their placement on the the map (above or below other elements).
- Create a copy of any map element.
- Paste any copied map elements.
- Refresh the map canvass.
- Disable/enable visibility for any map element.
- Locking a map element locks it in place on the canvass which does not allow you to move it around.
- Delete map element.
Now that you’ve mastered adding a single Anchor Label, let’s learn how to add many at the same time! This can be a great starting point when adding in many labels for the same layer while avoiding repetitive work. The best part? Once added to the map, Batch Labels act as individual Anchor Labels, meaning you have all the functionality discussed in this section and can make individual changes as needed.
Batch Labels
Batch labels provide a quick and convenient way to label many features all in one go. This will typically be used when all features need to be labeled for a specific layer and all the labels can be standardized. Batch labels also offer functionality for custom formatting for more advanced users.
- Click anywhere within your layout map to expose the Map Tools in the top menu bar and click on the Batch Labels icon.
- First, let’s talk about the familiar settings in this Batch Anchor Settings dialog box. A lot that we see here is similar to the Anchor Label settings in the previous section. This includes editing the connector type, the anchor’s location coordinates, the anchor node type, size, padding, fill, and stroke color. Additionally, you can edit the font size, font color and alignment.
- Now, let’s add some text to our Batch Labels. Since these labels are added to many different locations, they need to be dynamic.
- Click the Layer dropdown to choose what layer you want to label, then click the Label dropdown to choose what attribute you want to see in your label.
- Once you’re done setting the text and adjusting the settings, click Change.
- All the labels will appear for the locations visible in your layout map and, because it is dynamic, the attribute will display only the relevant attribute information for each location.
What if I want to label locations in batch with more than one attribute? Or add static text to the Batch Label? You’re in luck! There are Advanced Label options which we’ll walk through together.
- The advanced label options can be accessed by Selecting the Advanced Label text, just beneath the Label dropdown on the right.
- This will expose a textbox, in which you can select multiple attributes from the Label dropdown and manually arrange the order. Keep using the drop down to add more attributes as needed. You can also include static text including spaces, new lines, or other special characters.
- If you’d like to switch back to a single attribute, just click Basic Label at the bottom right corner, just below the text box.
- When you’re happy with the label setup, click Change.
- The labels will appear in your layout map with unique labels for each location.
- Still need help managing your batch labels? See the section above on Managing Anchor Labels in layout.
For more information on other standard Layout tools, please refer to the Getting Started in Layout article.
Related Articles
Getting Started in Layout
Layout provides a simple yet powerful tool for creating customized, presentation-level maps based on the data housed in your account. The layout tool is easy to navigate and offers a range of customization options to style your display areas, layers, ...Updating the Layout Map
Now that you know how to create a basic layout, you may want to adjust the layers, layout elements, or add new ones. This article will cover how to edit and update the layout to fit the required look. We will also cover using the template which you ...Map Navigation
The Sitewise map can be used to view locations and other custom data across the US, Canada, or any location around the world. While you are on the Map tab, there are a multitude of methods you can use to navigate and get a view of the specific state, ...Share Map
Meet Share Map, a quick and easy way to create and share custom maps with external parties or those that don't license Sitewise within your organization. You can choose an area on the map, add data layers and study areas (e.g. circle or drive time ...Map Styles & Street View
If the base map imagery displayed is not to your liking, you can choose from the 10 map styles available. Each of these provides different visual styles and highlights different features such as satellite imagery, street names, labels, etc. Changing ...