Updating the Layout Map
Now that you know how to create a basic layout, you may want to adjust the layers, layout elements, or add new ones. This article will cover how to edit and update the layout to fit the required look. We will also cover using the template which you may have previously saved.
Reviewing the Added Map
For the purpose of this article, we will use the below canvas as the base (same one used in the creating a layout article). For this example, the map contains a scale bar, a legend, and it fits the page. The layers added in the below are open locations, protected territories, and pipeline locations.
Using a template
How to save a template was covered in Getting started with layout, now we will show you how to use that template:
- Simply zoom into the area you want to create a map of.
- Once you click the Layout tab, instead of configuring the settings in the ‘Add Map’ tool, navigate to the ‘Open Layout’
folder and select the template you want.
- To double-check that the layout is a template, you will notice a symbol
on the right-hand side of the drop-down indicating it.
- After selecting the template, you can either open it to use it for the area you zoomed to or first select ‘Edit as a Template,’ which will allow you to make any changes to the template setup the same way you would to a regular map. This article will cover all the steps you must take to make any changes to the template and existing layouts.
Resizing the Map
If any changes have been made to the Page Layout, the map canvas (and any map elements added) will not be automatically resized to fit the new dimensions. You can resize the map window by:
- Manually dragging one of the anchor points
of the map window to the desired size
- Select the resize options in the bottom right corner, which include resizing to the maximum window width
, resizing to the maximum window height
, or both
.
- You can also use the alignment tools below to hook your layout elements to the border or centerlines of the map:
- Align Top
- Align on the horizontal axis
- Align on the vertical axis
- Align left
- Align right
- Align bottom
Accessing Layout Element Tools
To edit Layout elements such as the scalebar or the legend, you can either click the element itself on the canvas or click the element on the right in the Layout Elements box.
Once selected, a bar of tools will open at the top tool ribbon. Please see [link to basic layout tools section of basic article] for more information on how to use these.
Adding Additional Layers
If you need to add additional layers during or after creating your map you can do so but following the steps highlighted here:
- Navigate to the Update Map Layers tool in the Map Properties section of the tool ribbon.
- Once in the Update Map Layers tool, you can add and edit layers, as well as alter the contents of the basemap.
- Adding layers: Once clicking the
, check off which layers you would like to add and then click
at the bottom.
- Changing styling and filters: Here you can edit the layer name, icon, and filter the layer. Any styling changes made here will not affect the layer settings in the Map tab.
- Editing the contents of the Base Map: Check or uncheck certain base map elements if you would like to remove any background clutter.
- You will notice when adding layers to the map layout, the legend is automatically updated.
Managing the Legend
Removing Layers from the Legend
If you want to add layers but do not want them in the legend, you can:
- Select the legend
- Then navigate to the Change Legend Properties icon at the tool ribbon.
Once selected, you can
- Check layers on or off depending on which ones you want visible in your legend.
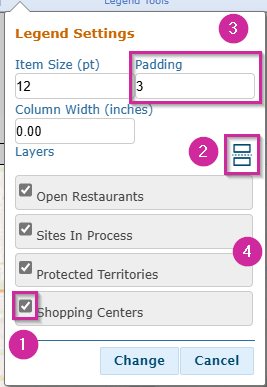
- You can also click the tool on the right to add column breaks to break up and widen the legend.
- You can also change the padding, which will make the space between legend items larger, the item size, and the column width.
- You can also click and drag legend objects to change their order in the legend.
Removing nonvisible locations from legend
If you are trying to add a layer with many different pins and not all relevant pins are displaying in your layout map, you can remove the clutter in the legend by turning on auto-hide pins.
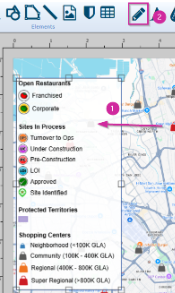
- Here, we have added our casual dining layer to the layout, but there are too many locations displayed in the legend, and not all of them are visible in the layout.
- To fix this issue, we want to navigate to the Update Map layers
tools section and select the pencil icon for the casual dining layer.
- Once clicked, the editing panel will open on the right and you will want to scroll to the bottom and select Auto-Hide Pins (1) and then click change (2).
- Once changed, you might notice a bunch of white space at the bottom of the legend. You can fix this by first selecting the legend and then clicking the vertical arrows on the bottom right of the layout tab. This will vertically fit the legend to the map height and from there you can resize the legend to your liking.
Other Legend Tools
- Font: Changes the font of the legend.
- Legend Font Color: Changes the color of the text in the legend.
- Color: Changes the background color of the legend.
- Line Width: Changes the border thickness of the legend.
- Stroke Color: Changes the border color of the legend.
- Opacity: Changes the transparency of the legend background. This does not affect how the text will be displayed.
Related Articles
Getting Started in Layout
Layout provides a simple yet powerful tool for creating customized, presentation-level maps based on the data housed in your account. The layout tool is easy to navigate and offers a range of customization options to style your display areas, layers, ...Managing Labels in Layout
Adding labels to map layouts is a great way to add important information and value to a map. There are many options available in Sitewise that allow you to customize labels to suit all your mapping needs. Sitewise Layout provides three options for ...Map Navigation
The Sitewise map can be used to view locations and other custom data across the US, Canada, or any location around the world. While you are on the Map tab, there are a multitude of methods you can use to navigate and get a view of the specific state, ...Share Map
Meet Share Map, a quick and easy way to create and share custom maps with external parties or those that don't license Sitewise within your organization. You can choose an area on the map, add data layers and study areas (e.g. circle or drive time ...Map Styles & Street View
If the base map imagery displayed is not to your liking, you can choose from the 10 map styles available. Each of these provides different visual styles and highlights different features such as satellite imagery, street names, labels, etc. Changing ...