Uploading Tables
The article will review the different ways to upload and add your data to a table in Sitewise.
- If you do not have a data file ready to upload but would like to still track information in the platform, take a look at the Creating a New Table from Scratch article. It outlines the steps for manually creating and adding a new table, all within Sitewise.
- For a clear breakdown of how tables differ from layers in Sitewise, check out the Table vs Layer article.
Before we dive into the data upload methods, let’s talk about data and files.
Data Preparation & File Requirements
It is important to ensure the file is structured and organized correctly prior to uploading. This will ensure the data is easy to read within Sitewise and help with any future updates needed. We have outlined the requirements of each file type below:
CSV
- Column names must be unique.
- Column headers must be in the first row.
- Remove all line breaks from headers.
- Remove/delete any footers in the file.
- Remove any unwanted data in columns to the right of your dataset.
- Remove all leading/trailing whitespace from the column headers.
- Remove all special characters from the column headers.
- Column headers cannot contain: / \ : ? * “ < > # |
- Remove any non-numeric values from columns that will be imported as integer or real e.g. "N/A” values in a sales field (Dollar signs ($) are okay for data representing dollar amounts).
- Values must be consistent and should not contain leading/trailing whitespace.
- Fields that contain numeric identifiers (e.g., Zip codes, Store Numbers) should be set to type ‘text’.
- Excel may treat these columns as numbers and mistakenly remove leading 0s (e.g., “00500” may become “500”).
Excel
- XLSX files must undergo the same preparations as CSV files with one additional consideration.
- Sitewise will import data from the first sheet in the input file even if this sheet is hidden.
ESRI Shapefile
- Zipped file that contains at least four files (SHP, SXX, DBF, and PRJ).
- Sitewise accepts Polygon or Point shapefiles.
MapInfo
- Zipped file that contains at least four files (TAB, DAT, MAP, and ID).
- Sitewise accepts Polygon or Point MapInfo files.
KML
- File in XML notation.
- Sitewise accepts Polygon or Point KML files.
The Upload Methods
Whether you're working with a brand-new data set or refreshing the data in an existing table, we’ve got you covered. Let's review the upload methods:
Add Data as New Table
- If the data is not already in Sitewise, then use this option to create a new table when importing a file.
Replace Data in an Existing Table
- Replacing data in Sitewise replaces all records in a table with the new data uploaded from a file. This approach is particularly useful because the table ID and structure remain unchanged, ensuring that all existing references to the table (such as mapsets, reports, and workflows) continue to work seamlessly with the new data.
Append Data to an Existing Table
- Appending in Sitewise adds new data to an existing table without altering or replacing the current records. This method preserves the table structure, ensuring that all references, such as mapsets, reports, and workflows, remain intact and continue to work with the new data. Essentially, it adds all data from the uploaded file as new records to the table.
Before we review how to upload files, we recommend that you download a copy of the table, if it already exists, before you make any changes. This downloaded copy can be used as a backup if something goes wrong, as a template for the new data you're uploading, or saved as a reference. Not sure how to download? Check out the Exporting Tables guide.
Initiate a File Upload
No matter which method you choose, they all start off the same way – by importing a file into the Sitewise import tool. Let’s review how to do this.
Note that file uploads are limited to a count of 5,000 records. If your file contains more records than the limit, please reach out to Sitewise Support. They’ll be able to work with you depending on what your goals are.
- Open the layers panel and in the bottom right corner, click on the upload icon.
- Click on the Select a File button.
- Navigate to the file's location on your computer, select it, and click Open.
- Make sure the file you choose follows the correct parameters depending on the file type.
- The file name and file size will appear in the Upload a Layer window.
- Click on the upload button.
- A spinning wheel will appear, indicating where the file is at in the loading process.
Once loaded, it's time to choose what method you want to use with the newly loaded data file.
Upload Method 1: Add Data as a New Table
After following the steps in the Initiate a File Upload section, you’ve decided to create a new table with the file you’re uploading. Let’s review the steps together.
Step 1: Layer Name & Upload Method
- Layer Name: Name your new Table as you want it to show in Sitewise.
- This can be edited later in table settings.
- Select Add as a New Layer from the Upload Method dropdown.
- Click on the next button.
Step 2: Set Layer Geometry
This step is crucial. Records need to have a geometry so they can be visualized on the map.
If you upload a file that does not natively contain geometry (e.g. Excel or CSV files), you must specify the fields, so the points can be geocoded. If not defined in this step, your data will not appear on the map in Sitewise.
- Note: If your file does natively include geometry (TAB, SHP, and KML files), you will not see this step and can move to Step 3 below.
Files with Coordinates
- By default, Sitewise will try to detect your file's latitude and longitude columns.
- This is only possible if the fields in the file follow one of the coordinate naming conventions below:
- “latitude” and “longitude,”
- “lat” and “long”
- “y” and “x”, respectively
- Capitalization of these fields does not matter.
- While this option appears by default, it’s recommended that you choose Specify Lat/Long Columns from the Geometry dropdown.
- If your fields match the naming conventions above, the latitude and longitude fields will already be filled by default.
- This ensures your data is added as expected.
- If the fields do not automatically populate or point to the wrong fields in the Coordinate Columns, use the dropdowns to choose the right fields.
Files with Address Data
If your file does not contain coordinates but it does have address fields, Sitewise can geocode the records for you.
- Choose Geocode Locations from the Geometry dropdown.
- If your address fields match the typical naming conventions, they will populate by default in the Geocode Columns.
- If the fields do not automatically populate or they point to the wrong fields in the in your file, use the dropdowns to choose the correct fields.
Step 3: Set Column Options
- Sitewise will auto-detect and assign the data types for each column based on the values in the uploaded file (text, numeric, etc.).
- Data which is assigned to the wrong type will not import correctly, so its important to review and make any necessary adjustments.
- Set any numeric fields as “Real”
- Set any text fields as “String”
- Note:
- Any identifying field that may have a leading 0 (e.g. Store Numbers and Postal Codes) should be changed to type “String”.
- It is best practice to assign numeric fields to type “Real” to preserve any decimal values in your data. You can change the number of decimal places you wish to display using table settings if you wish to see only whole numbers.
- Use the checkboxes under “Ignore” if you don’t want to import a column.
- Once you are finished with the settings, click on the “Add Table” button.
Step 4: Final Steps
When the data has finished uploading, an Upload Summary window will appear, with a few options to help you get the most out of your data.
- Add to Map: Add your Table as a layer to the current mapset.
- Follow the steps in the Styling Your Data article to add the data to the map.
- Edit Layer Settings: Edit the settings for the new table you created.
- For information on how to do this, read the Table Settings article.
- Run a Batch Report: Create a custom report for the records in the new table.
- Follow the steps in the Custom Batch article.
These options can also be accessed later in Sitewise so it’s not necessary to use these options right away.
Large data files may not upload immediately. If it is taking longer than expected, contact Sitewise Support, who can advise if there are any issues with the upload.
Upload Method 2: Replace Data in an Existing Table
This method is used to replace all of the data from an existing table.
- Note: When using this method, only columns present in the existing table can be replaced. If there are new columns in the uploaded file, they will not be added to the table. Reach out to Sitewise Support if you need to make edits to the table columns.
After following the steps in the Initiate a File Upload section, you’ve decided to create a new table with the file you’re uploading. Let’s review the steps together.

Warning: Do not use this method if the table uses attachments. All attachments and images will be lost if this method is used. Contact Sitewise Support if you want to keep attachments.
Step 1: Layer Name & Upload Method
- Ignore the table Name.
- You are replacing data in a table that already exists. This field will have no effect on the table.
- Select Replace Data in an Existing Table from the Upload Method drop-down menu.
- Under Existing Table, use the dropdown to select the name of the table that you are replacing.
- If the table doesn’t appear in the dropdown, please reach out to Sitewise Support.
- Click on the next button.
Step 2: Set Layer Geometry
This step is crucial. Records need to have a geometry so they can be visualized on the map.
If you upload a file that does not natively contain geometry (e.g. Excel or CSV files), you must specify the fields, so the points can be geocoded. If not defined in this step, your data will not appear on the map in Sitewise.
- Note: If your file does natively include geometry (TAB, SHP, and KML files), you will not see this step and can move to Step 3 below.
Files with Coordinates
- By default, Sitewise will try to detect your file's latitude and longitude columns.
- This is only possible if the fields in the file follow one of the coordinate naming conventions below:
- “latitude” and “longitude,”
- “lat” and “long”
- “y” and “x”, respectively
- Capitalization of these fields does not matter.
- While this option appears by default, it’s recommended that you choose Specify Lat/Long Columns from the Geometry dropdown.
- If your fields match the naming conventions above, the latitude and longitude fields will already be filled by default.
- This ensures your data is added as expected.
- If the fields do not automatically populate or point to the wrong fields in the Coordinate Columns, use the dropdowns to choose the right fields.
Files with Address Data
If your file does not contain coordinates but it does have address fields, Sitewise can geocode the records for you.
- Choose Geocode Locations from the Geometry dropdown.
- If your address fields match the typical naming conventions, they will populate by default in the Geocode Columns.
- If the fields do not automatically populate or they point to the wrong fields in the in your file, use the dropdowns to choose the correct fields.
Step 3: Set Column Options
- Sitewise will auto-detect and assign the data types for each column based on the values in the uploaded file (text, numeric, etc.).
- Data which is assigned to the wrong type will not import correctly, so its important to review and make any necessary adjustments.
- Set any numeric fields as “Real”
- Set any text fields as “String”
- Note:
- Any identifying field that may have a leading 0 (e.g. Store Numbers and Postal Codes) should be changed to type “String”.
- It is best practice to assign numeric fields to type “Real” to preserve any decimal values in your data. You can change the number of decimal places you wish to display using table settings if you wish to see only whole numbers.
- Ensure the columns in your file are replacing the correct columns in the existing table by adjusting the “Target” as needed.
- Use the checkboxes under “Ignore” if you don’t want to import a column.
- Once you are finished with the settings, click on the “Replace Data in Table" button.
Step 4: Final Steps
When the data has finished uploading, an Upload Summary window will appear, with a few options. 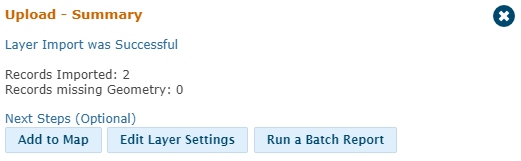
- Add to Map: If you’re replacing data, it’s likely that the table is already styled as a layer.
- If you need to add a new layer, or it’s not yet on the map, follow the steps in the Styling Your Data article to add the data to the map.
- Edit Layer Settings: Edit the settings for the table you replaced the data in.
- For information on how to do this, read the Table Settings article.
- Run a Batch Report: Create a custom report for newly replaced records in the table.
- Follow the steps in the Custom Batch article.
These options can also be accessed later in Sitewise so it’s not necessary to use these options right away. In fact, it might be beneficial to quality check your data to make sure the replace worked as expected before taking new steps with the table.
Large data files may take a few minutes to upload. If it is taking longer than expected, contact Sitewise Support, who can advise if there are any issues with the upload.
Upload Method 3: Append Data to an Existing Table
This method is used to add rows (records) to an existing table. For example, if the table contains 5 rows and the new data file has 10 rows of data, the appended table will now have 15 rows (records).
- Note: When using this method, only columns present in the existing table can be replaced. If there are new columns in the uploaded file, they will not be added to the table. Reach out to Sitewise Support if you need to make edits to the table columns.
After following the steps in the Initiate a File Upload section, you’ve decided to create a new table with the file you’re uploading. Let’s review the steps together.
Step 1: Layer Name & Upload Method
- Ignore the table Name.
- You are appending data to a table that already exists. This field will have no effect on the table.
- Select Append to an Existing Table in an Existing Table from the Upload Method drop-down menu.
- Under Existing Table, use the dropdown to select the name of the table that you are appending to.
- If the table doesn’t appear in the dropdown, please reach out to Sitewise Support.
- Click on the next button.
Step 2: Set Layer Geometry
This step is crucial. Records need to have a geometry so they can be visualized on the map.
If you upload a file that does not natively contain geometry (e.g. Excel or CSV files), you must specify the fields, so the points can be geocoded. If not defined in this step, your data will not appear on the map in Sitewise.
- Note: If your file does natively include geometry (TAB, SHP, and KML files), you will not see this step and can move to Step 3 below.
Files with Coordinates
- By default, Sitewise will try to detect your file's latitude and longitude columns.
- This is only possible if the fields in the file follow one of the coordinate naming conventions below:
- “latitude” and “longitude,”
- “lat” and “long”
- “y” and “x”, respectively
- Capitalization of these fields does not matter.
- While this option appears by default, it’s recommended that you choose Specify Lat/Long Columns from the Geometry dropdown.
- If your fields match the naming conventions above, the latitude and longitude fields will already be filled by default.
- This ensures your data is added as expected.
- If the fields do not automatically populate or point to the wrong fields in the Coordinate Columns, use the dropdowns to choose the right fields.
Files with Address Data
If your file does not contain coordinates but it does have address fields, Sitewise can geocode the records for you.
- Choose Geocode Locations from the Geometry dropdown.
- If your address fields match the typical naming conventions, they will populate by default in the Geocode Columns.
- If the fields do not automatically populate or they point to the wrong fields in the in your file, use the dropdowns to choose the correct fields.
Step 3: Set Column Options
- Sitewise will auto-detect and assign the data types for each column based on the values in the uploaded file (text, numeric, etc.).
- Data which is assigned to the wrong type will not import correctly, so its important to review and make any necessary adjustments.
- Set any numeric fields as “Real”
- Set any text fields as “String”
- Note:
- Any identifying field that may have a leading 0 (e.g. Store Numbers and Postal Codes) should be changed to type “String”.
- It is best practice to assign numeric fields to type “Real” to preserve any decimal values in your data. You can change the number of decimal places you wish to display using table settings if you wish to see only whole numbers.
- Ensure the columns in your file are replacing the correct columns in the existing table by adjusting the “Target” as needed.
- Use the checkboxes under “Ignore” if you don’t want to import a column.
- Once you are finished with the settings, click on the “Add Layer" button.
Step 4: Final Steps
When the data has finished uploading, an Upload Summary window will appear, with a few options.
- Add to Map: If you’re appending data, it’s likely that the table is already styled as a layer.
- If you need to add a new layer, or it’s not yet on the map, follow the steps in the Styling Your Data article to add the data to the map.
- Edit Layer Settings: Edit the settings for the table you just added records to.
- For information on how to do this, read the Table Settings article.
- Run a Batch Report: Create a custom report for records in the table.
- Follow the steps in the Custom Batch article.
These options can also be accessed later in Sitewise so it’s not necessary to use these options right away. In fact, it might be beneficial to quality check your data to make sure appending the data worked as expected before taking new steps with the table.
Large data files may take a few minutes to upload. If it is taking longer than expected, contact Sitewise Support, who can advise if there are any issues with the upload.
Related Articles
Creating a New Table from Scratch
When you turn on a layer in Sitewise, the data shown on the map is stored in a table. These tables store data for points and polygons. This includes but not limited to store locations, customer spotting, franchise territories and store trade areas. ...Tables vs Layers
What Are Layers? Layers are visual depictions of data from a user table or licensed point subscriptions, such as ChainXY orStreetLight Traffic Data. Layers can be displayed on the Sitewise map by adding it to a mapset. Layers offer numerous styling ...Table Settings
Table settings in Sitewise allow you to manage key aspects about how a table and its data are used and controlled. This includes everything from setting who can access the table, to setting what table information is displayed when added as a layer to ...Virtual Tables
A Virtual Table is designed for scenarios where you want to display a subset of your data or restrict access to certain information for specific user groups based on your Master (main) Table. The key difference between a Master Table and a Virtual ...Styling Your Data
At Sitewise, we understand the importance of visualizing data for better analysis and insights. That’s why we’ve made it simple to add your data and customize its styling for a seamless mapping experience. This article will walk you through all the ...