Managing Mapsets
A map set is a collection of layers and their display settings. Each Sitewise group has a default map set that loads every time you enter a new Sitewise session. Saving your map set after making layer changes, additions, or removals makes it easy for you and others in your organization to use the same settings after starting a new Sitewise session. To learn how to add layers to your mapset, please refer to the Styling Your Data article then follow the steps below to save your new layer!

Note: The default mapsets are set by your organization administrator with the help of the Sitewise Team. Please connect with both your Org Admin and Sitewise if you need to make changes to or set a new default mapset.
Use Cases
- I want to style a layer how I see fit before I have others in my team work with it.
- I prefer to have certain layers turned on/off which is different from the settings in my default mapset.
How to Create and Save a Mapset
Changes to layers within Sitewise are not automatically saved as this can lead to lost data. Therefore, after making any necessary changes (adding, editing, removing), it is crucial that you save a new mapset. This enables you to quickly share the necessary information for ongoing projects with your team members for review and analysis.
- Select the Save/Load Map Set Settings
- Click Save Map Set
- A pop up will appear
- Add a unique identifier that will help you find the map set later. We recommend adding today’s date and a meaningful name.
- E,g. Market Planning 10082024
- There are two options to save:
- Click Save a Copy. This prevents you from overwriting an existing map set. We recommend this option to use as you can always delete older unwanted mapsets once the right mapset is created.
- Click Overwrite to save the changes in the current mapset
- See the warning below before using this option.
- Optional: Selecting Save only visible layers ensures that only layers turned on in your current mapset will be saved. Any layers not turned on will not be copied into your new mapset. If this option is left unchecked, then all layers will be copied over.
- Optional: Click on the checkbox beside Share and then the individual groups to grant them access to the mapset you have created.
- Click Save. This will save all your edits and can now be loaded after refreshing or logging back into Sitewise.

Warning: Never overwrite a Default mapset as the previous version cannot be recovered. Only save a copy with a different name unless you are working on a mapset that you have created.
Note: Mapsets can only be shared at user group level and not on an individual user basis.
How to Load a Mapset
After refreshing or logging back in, it will bring you back to the default mapset that is determined by your organization administrator. Since you had saved your mapset previously, let’s get it loaded onto your platform!
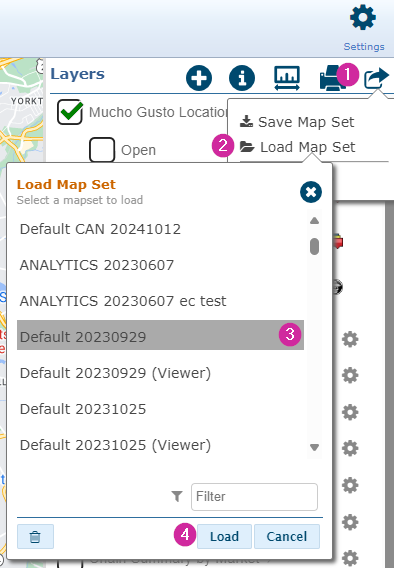
- Select the Save/Load Map Set Settings
- Click Load Map Set. list of all your saved map sets along with any other map sets that are shared within your organization.
- Select the Mapset you created in the displayed list
- Select Load to open up the mapset on to the platform
Note: If you have a long list of map sets, simply scroll through the list, or use the handy filter at the bottom right of the pop-up
How to Delete a Mapset
You do not need to delete your mapsets but this process does help you keep your mapset list clean. Be careful to only remove your personal mapsets, and not those of your coworkers or organizational default mapsets.
Follow Steps 1 to 3 in the section above. Select the trash icon to delete your selected mapset.
Note: If you would like to make any changes to your default mapset then, please have the account admin connect with the Support Team sharing as much information as possible about the desired changes.
Related Articles
Adding Thematic Layers
Thematic layers enable the visualization of complex data, making it easier to identify patterns and trends. These layers, such as heat maps, dot density maps, or symbols, are commonly used to represent demographic data and other variables, offering ...Managing Labels in Layout
Adding labels to map layouts is a great way to add important information and value to a map. There are many options available in Sitewise that allow you to customize labels to suit all your mapping needs. Sitewise Layout provides three options for ...Managing Point and Polygon Data
Sitewise makes managing your data easy. This article will review how to make edits to point and polygon layers, including adding and moving points, and reshaping polygons. Note: It’s important to note that in some accounts, certain tables might have ...Adding Study Areas to Polygon Layers
Adding Study Areas to Polygon Layers At Sitewise, we understand the importance of collaboration. When working on an analysis yourself, the My Project tab is a fantastic way to quickly review a site and manage your work. In addition to saving a ...Styling Your Data
At Sitewise, we understand the importance of visualizing data for better analysis and insights. That’s why we’ve made it simple to add your data and customize its styling for a seamless mapping experience. This article will walk you through all the ...